Independent Renault Forums banner

Renault Laguna 1 - Instrument Panel Removal(with pictures)

75K views 33 replies 18 participants last post by  np63om  
#1 · (Edited by Moderator)
Hi folks, finally sorted the rattle behind the speedo cluster on the old Lag.

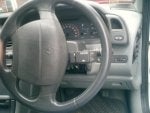
Pic 1. Remove corner trim/switch panel-just one torx screw and a sharp tug.

Image


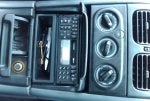
Pic 2+3. Remove three upper screws on the cowling, there are
usually two on the lower half of the cowling but fortunately the previous owner left these unattached as to access these you have to remove the cowling surrounding the steering column, all screws so far are T20 which is very helpful.

Image


Image


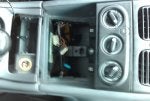
Pic 4.Remove the three screws holding the panel in.

Image


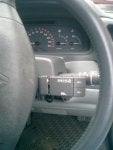
Pic 5. After a bit of swearing tilting and wiggling it's getting close.

Image


Pic 6.It's out :)

Image


The last pic is where the clips to hold the cowling at the bottom should be, but as I said these had been removed earlier. Before putting it all back together I checked for any loose bits and took all the connectors apart and sprayed with WD, also I glued rubber washers to the mounting holes with aquarium sealer, all back together and the rattle appears to have stopped. The first pic is a bit out of focus but I was out on the town last night and haven't quite recovered yet :d

Image
 
#3 ·
You are very welcome Laggy, I'd noticed a couple of posts regarding this issue with no answers and as I was getting really p$$ed off with the rattle on mine I thought I'd do it today, if you can insert a pic of the corner trim/switch bitty as step one that would be great as although the rest of mine turned out okay the first one didn't. Might be useful to include pics for removing the steering wheel cowl screws(only three) to gain access to the two lower screws on the instrument panel, look foreward to some meat :d
Regards Leroy
 
Save
#7 ·
Hos geldinez! Thank you for your e-mail, I hope my reply helped you but as I said it is difficult to find the plastic cover for your clocks on it's own. Good luck with your search
Regards Leroy
 
Save
#9 ·
Hi again Erdem, I could not open the picture in your e-mail so I guessed it was the plastic cover for your clocks you were looking for. Do you have a Digital Camera? If so you can make a picture of the piece you need and if you save it to your PC you can send it in your reply. If you write your message and then scroll down the page you will see 'Manage Attachments', click on this and find the saved picture and open the file, then click on upload and the picture will be fixed in your message, I have a picture of my Laguna.
Regards Leroy
Iyi gecelar Arkada?
 

Attachments

Save
#15 ·
Odometer Bulbs

Thanks for the info on taking the instrument panel apart, looks MOST useful when I get round to doing it. It seems that my odometer bulb(s) has (have) gone (can read the odometer with a torch). It'd be REALLY helpful to be able to buy new one(s) before I strip the instrument panel. Anyone know the details of the bulb(s)? Cheers.
 
#16 ·
Instrument Panel Bulbs

The instrument panel bulbs are all small 1.2W bulbs. You can buy them with or without the holders and are marked as "509T" in Halfords (cost a couple of quid each). I ended up replacing 7 of mine (including the 2 odometer bulbs) that I knew were knackered so it's worth buying a few more than you think you need ! !
 
#21 ·
How to remove the centre console to replace the bulb which lights up the air control knobs.

Soo here is some pictures of how i removed the centre console panels to get to the air control knobs in a Laguna Mk1.
NOTE: make sure you have the radio code, as it has to be removed. It cost me £7 to get a new one!.

First i removed the radio, using U clips things!. then once that is remove the tray under the radio can be removed by getting a flat screw driver and lifting out all four clips holding it in place, then a final tug and it comes out.
Next is the removal of the lighter/ash tray console, remove the ash tray (pull out) then remove the two * screws holding the rest in, gently pull this out with it some of the gear stick cover. once this it out four * screws at the bottom of the radio bracket need to be removed.
Once they have being remove a further two * screws inside the hole need removing, (they are at the back, Not the big silver one). Once all 6 * screws removed the radio holder part can be removed.
This is where i when wrong, trying to remove the facia of the control knobs, I lifted the bottom front of the control knobs facia however ended up cracking the top, see pictures, however enabled me to get the the bulb which lights them. this bulb is the same for the clock! simply unclip the circuit board and rotate the bulb to remove it. You can get replacement ones in halfords for £3, you have to look hard for it though! See the pictures for anymore details, anyway the bit i cracked is hardly noticeable when i but the unit all back and now i can see the knobs in the dark :).
 

Attachments

#22 ·
I have noticed several more mature Lagunas suffer from failed backlighting on the instrument panel, and mine is now going the same way. If I follow these very clear instructions to dismantle the instrument panel will I be able to get to the bulb or whatever needs to be replaced? Best to ask before I start! Excellent forum - keep up the good work. Alan.
 
#25 ·
Job done. New bulbs (without holders) were 60p each.
A couple of extra points that may be helpful:
1. Access to the screws for the console around the steering column and lock is easier if you turn the wheel one way to get to one screw then the other way to access the second screw.
2. My flashy RXE model (oooh!) has a third screw holding the lower half of the console, behind the two shown in your picture.
3. My car also has controls for the stereo near the right hand stalk, and this unit needs to be removed to get the upper half of the console off. To do this slide the left hand section of the plastic cover to the left after turning the steering wheel so the airbag is to the left. This will give you room to get a T20 to undo the screw on the stereo control, then the console comes away. I attach a couple of pictures of this if you want to add them to the thread.
 

Attachments

#27 ·
Looking forward to following Leroy's step by step as will be replacing my speedo unit. Anyone able to suggest how long it might take to do? just so i've got a rough idea- i'm sure it'll take me longer though!

(need to take more care then when i replaced the wiper motor and broke my windscreen! lol)
 
You have insufficient privileges to reply here.